How to take Vinted photos with just a phone
· 5 min read
Photos decide whether anyone reads your description. A buyer scrolling the Vinted catalogue gives each item about a second, and in that second the only thing working for you is the picture. The good news is that the gap between a bad photo and a good one is almost never the camera — it's the light and the surface.
How do you take good Vinted photos with just a phone?
Shoot next to a window in daylight, never under a ceiling light. Put the item on a plain, neutral surface and lay it flat and square to the camera. Take the shots buyers actually look for — the whole item, the label, the fabric close up, and every flaw. Then leave the colour alone.
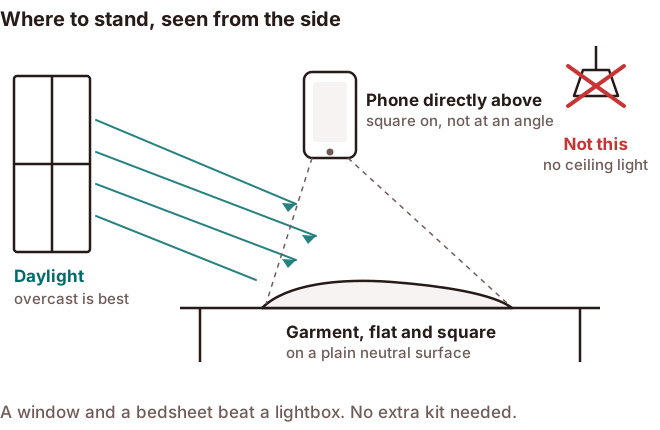
Why shoot next to a window and never under a ceiling light?
Ceiling bulbs sit above the item and throw hard shadows straight down. They also cast a colour — warm yellow from most bulbs, green from older fluorescents — and that colour lands on the fabric. A grey jumper photographed under a kitchen light looks beige, and the buyer who receives an actually-grey jumper feels misled even though you did nothing wrong.
Daylight from a window is soft, neutral and free. Lay the item on the floor or a table within a metre or two of the window, with the light coming from the side rather than behind you. Overcast days are better than bright sun: direct sunlight blows out highlights and makes shadows harsh.
If you can only shoot in the evening, shoot tomorrow. It is genuinely that much better.
What background should you use?
The single fastest upgrade — and the thing that most separates a Vinted listing that looks professional from one that does not — is putting something plain underneath. A white or light-grey bedsheet, ironed flat, costs nothing and instantly removes the biggest tell of an amateur listing — carpet, floorboards, a duvet with a pattern, other clothes in the frame.
- Light grey and off-white flatter almost everything and don't tint the item.
- Avoid pure white if the item is white — it disappears. Use grey instead.
- Avoid black backgrounds for dark items, for the same reason.
- Whatever you pick, use it for every listing. Consistency makes a profile look like a shop.
Lay it flat and square
Hanging an item on a door lets it twist and hang unevenly, and you get a shadow behind it. Flat-lay is easier to make look deliberate: smooth the fabric with your hand, square the shoulders, lay the sleeves at a slight angle rather than straight down, and shoot from directly above rather than at a slant.
Standing over the item and shooting down will distort the shape — the near end looks bigger. Step back and zoom slightly if your phone allows, or hold the phone higher and centre the item in the frame. Keeping the phone parallel to the floor is the whole trick.
Which shots do buyers actually want?
One hero shot sells the item; the rest prevent questions and returns. A complete set is usually five photos:
- 1The full item, flat, from above — this is the thumbnail, so make it the best one.
- 2The brand and care label, close enough to read.
- 3The fabric up close, so the texture and weave are visible.
- 4Any flaw: a mark, a bobble, a loose hem, worn cuffs.
- 5A detail that sells it — a print, buttons, a lining, hardware.
Photograph flaws deliberately and in focus. It feels counterproductive, and it isn't: an honest flaw photo converts better than a hidden one, because it tells the buyer you aren't hiding anything else. It is also your evidence if someone opens a dispute claiming the item wasn't as described.
Should you edit the colour afterwards?
Phone auto-enhance and filter presets push saturation and warmth, and both change the item's colour. Boost the exposure a little if the shot is dark, and stop there. The most common cause of a bad review in secondhand selling is a colour that didn't match — a magenta hoodie photographed under a filter arrives looking plum, and the buyer is disappointed by something that was never the item's fault.
This is the one rule worth being strict about. Everything else on this page is a preference; colour accuracy is what stops disputes.
The short version
- Daylight, from the side, on an overcast day.
- Plain light-grey sheet underneath, the same one every time.
- Flat, smoothed, shot from directly above with the phone level.
- Five photos: full item, label, fabric, flaw, detail.
- Adjust brightness if you must. Never touch the colour.
ListQuick's Studio Mode does the background and lighting part for you — it puts the item on a clean studio backdrop and evens the light out, without altering the item's colour. But a photo taken near a window still beats a photo taken under a ceiling bulb, whatever you run it through afterwards. Start with the light.
ListQuick is independent and is not affiliated with, endorsed by, or connected to Vinted. Vinted is a trademark of its respective owner and is referred to here only to describe where this guide applies.